
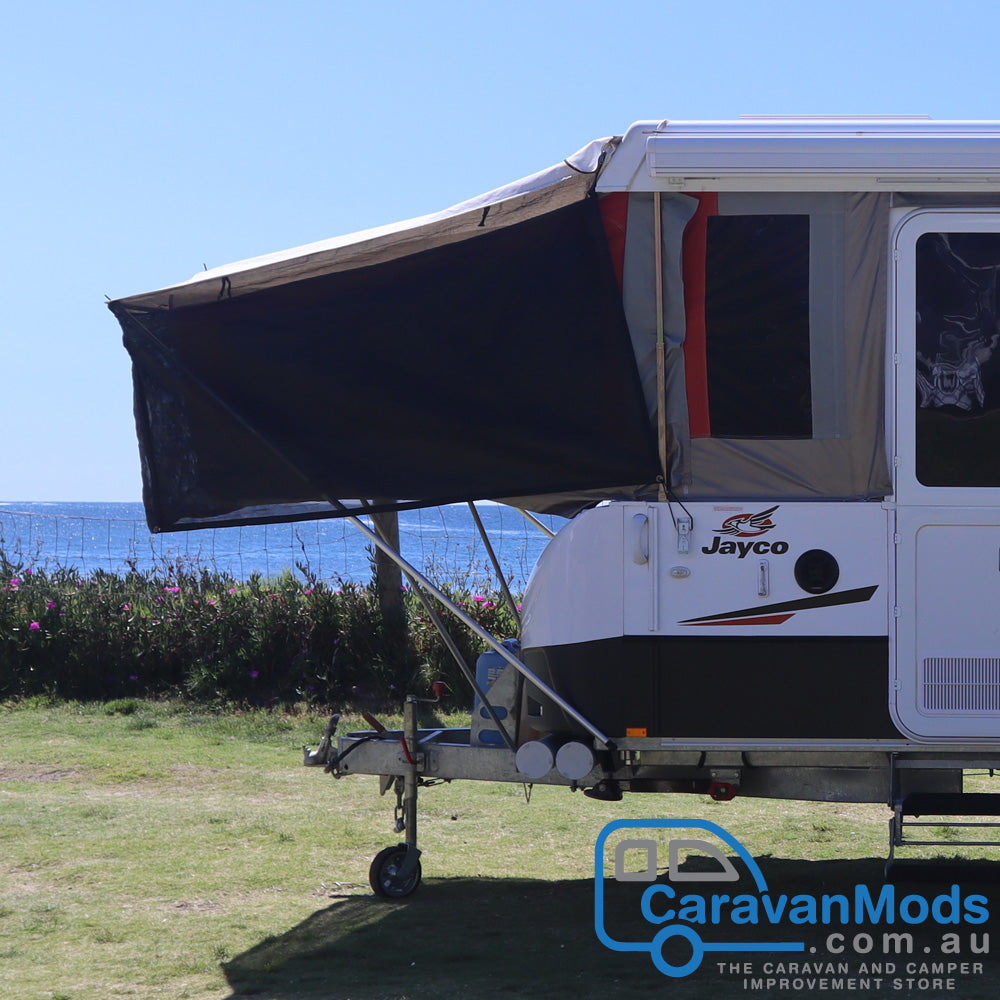


Bed Fly Conversion Kit
Click & Collect Availability
Click & Collect Availability
Delivery and Shipping
Delivery and Shipping
Warehouse processing Time: All orders placed before 1pm AEST leave our warehouse that same day.
Shipping Costs: To see shipping costs, simply add the product(s) to your cart and head to checkout. Express and regular shipping options will be available at checkout.

Bed Fly Conversion Kit
If you're still using guy ropes and pegs to set up your Jayco camper trailer bed end flies, this kit eliminates the need for them on most trips. The CaravanMods Bed Fly Conversion Kit converts your existing bed flies into a freestanding structure, removing your reliance on ropes and pegs and the tripping hazards that come with them. It fits the Jayco Swan, Lark, Hawk, Eagle, Flamingo and most other Australian wind-up camper trailers. Setup goes from a two-person job with ropes to a solo task in minutes. Most of our customers call it the single best modification they've made to their camper.
Quick Summary
Hey, we get it! This page can seem overwhelming. If you're into reading detail you can geek out on section 2. If you just want a quick read then answer the three questions in the kit finder below — whichever kit it recommends, we guarantee that it fits your setup.
Kit finder
Answer 3 questions and we'll confirm exactly what to order. Takes 30 seconds.
Not sure which kit you need?
Answer 3 quick questions and we'll tell you exactly which option and mounting kit is right for your trailer — no guessing required.
Do you have the following existing bed fly poles?
You must have all of the following:
- 6 x upright poles (Pole A)
- 2 x roof rafter pole (Pole B)
- 1 x roof rafter bracket on the trailer at each end
- Poles must be 25mm OD at the thick end and 22mm OD at the thin end

↕ Tap to enlarge
How would you like to handle your existing poles?
This determines which option is right for you.
What year is your camper trailer?
Check the compliance plate on your drawbar or A-frame if unsure.
Prefer to work it out yourself?
Use this to identify your option and mounting kit manually.
Full Product Detail
Complete breakdowns of every option, mounting kit, inclusions, and installation guidance.
Choose your option
Choose Option A, B or C based on your existing poles and how much modification you are willing to do. All three options produce the same end result.
Traditional Conversion Kit
Best suits: Compatible poles, confident in DIY. Allow 1–2 hours for a once-off install.
What we supply: Bag of loose plastic inserts and the correct mounting hardware.
- Uses your existing poles
- Requires cutting and removal of existing fittings
- New fittings inserted and secured into poles
- Lowest-cost option if poles are compatible

Image shows contents for Option A + Mounting Kit 1
- 6 x upright poles (Pole A)
- 2 x roof rafter pole (Pole B)
- 1 x roof rafter bracket at each end of trailer
- Poles must be 25mm OD thick end / 22mm OD thin end
Hot Swap Pole Kit
Best suits: Compatible poles, no cutting wanted. Very little DIY skill required. Allow 30 minutes for a once-off install.
What we supply: Complete and half poles that assemble easily with your existing poles.
- Telescope apart your existing uprights, then assemble the spiked end into our supplied half poles
- No cutting required — fully reversible
- Great for resale value: new owner retains the factory option

Image shows contents for Option B + Mounting Kit 1
Same pole requirements as Option A — compatible poles required. No cutting needed.
Complete Pole Kit
Best suits: Missing poles, uncertain compatibility, want everything supplied, or anyone who wants a factory-finished solution. Allow 10 minutes for a once-off install.
What we supply: Everything you need — no reliance on your existing poles whatsoever.
- Complete pole kit included
- Simplest option when pole compatibility is uncertain
- Factory-finished, high-quality solution

Image shows contents for Option C + Mounting Kit 1
Everything is supplied — no existing poles needed.
| Option | Cutting | Install time | Best for |
|---|---|---|---|
| Option A | Yes | ~1–2 hours | Compatible poles, happy to modify |
| Option B | No | ~30 minutes | Compatible poles, want reversible setup |
| Option C | No | ~10 minutes | Missing or incompatible poles, or want factory-finished |
Choose your mounting kit
The mounting kit determines how and where the angled upright poles attach to your trailer. Your choice here also determines what pole ends we supply with your Option A, B or C kit.
Bolts — front and back
Universal — suits all Outback, Touring and Bushpack models.
Bird beak plates — front and back
Very rarely needed — only for 2019 Outback models or custom installs.
Hybrid — bolts one end, bird beaks one end
For specific configurations requiring mixed mounting at each end.
General guidance: Kit 1 suits all Touring, Outback and Bushpack models and is the correct choice for almost everyone. Some older Outback photos online show bird beak plates on the rear bumper bar — we no longer recommend this as the poles sit too narrow and scrape the slide-out beds. Bolts mounting positions the poles slightly wider, keeping them well clear.
What's included
Inclusions vary depending on your Option and Mounting Kit combination. Tap a card below to expand.
A Option A
+ Mounting Kit 1
- 8 x Bow end inserts (SKU: 401)
- 2 x Clips (SKU: 400)
- 2 x Hardware Kits for Bolts Mounting (SKU: BFCKHW02)
+ Mounting Kit 2
- 4 x Bow end inserts (SKU: 401)
- 4 x Bird Beak Pegs (SKU: 406)
- 4 x Bird Beak Plates (SKU: 405)
- 2 x Clips (SKU: 400)
+ Mounting Kit 3
- 6 x Bow end inserts (SKU: 401)
- 2 x Bird Beak Pegs (SKU: 406)
- 2 x Bird Beak Plates (SKU: 405)
- 2 x Clips (SKU: 400)
- 1 x Hardware Kit for Bolts Mounting (SKU: BFCKHW02)
B Option B
+ Mounting Kit 1
- 4 x Bow end insert outer pole (you supply inner from existing uprights)
- 2 x Spreader bar with bow end inserts on both ends
- 2 x 150mm Spigot to C clip Pole
- 2 x Hardware Kits for Bolts Mounting (SKU: BFCKHW02)
+ Mounting Kit 2
- 4 x Bird beak peg insert outer pole (you supply inner)
- 2 x Spreader bar with bow end inserts on both ends
- 2 x 150mm Spigot to C clip Pole
- 4 x Bird Beak Plates
+ Mounting Kit 3
- 2 x Bird beak peg insert outer pole (you supply inner)
- 2 x Bow end insert outer pole (you supply inner)
- 2 x Spreader bar with bow end inserts on both ends
- 2 x 150mm Spigot to C clip Pole
- 2 x Bird Beak Plates
- 1 x Hardware Kit for Bolts Mounting (SKU: BFCKHW02)
C Option C
+ Mounting Kit 1
- 4 x Bow end to straight spigot poles
- 2 x Spreader bar with bow end inserts on both ends
- 2 x Bow end to bent spigot roof rafter poles
- 2 x 150mm Spigot to C clip Pole
- 2 x Hardware Kits for Bolts Mounting (SKU: BFCKHW02)
- 2 x Stainless steel roof rafter mounting brackets
+ Mounting Kit 2
- 4 x Bird beak peg to straight spigot poles
- 2 x Spreader bar with bow end inserts on both ends
- 2 x Bow end to bent spigot roof rafter poles
- 2 x 150mm Spigot to C clip Pole
- 4 x Bird Beak Plates
- 2 x Stainless steel roof rafter mounting brackets
+ Mounting Kit 3
- 2 x Bird beak peg to straight spigot poles
- 2 x Bow end to straight spigot poles
- 2 x Spreader bar with bow end inserts on both ends
- 2 x Bow end to bent spigot roof rafter poles
- 2 x 150mm Spigot to C clip Pole
- 2 x Bird Beak Plates
- 1 x Hardware Kit for Bolts Mounting (SKU: BFCKHW02)
- 2 x Stainless steel roof rafter mounting brackets
Note: All inserts are designed to fit both 22mm and 25mm pole ends due to their dual diameter stem design.
Important notes before buying
⚠ The bed fly is not included. This is a pole conversion kit only. The bed fly pictured is not included. You can purchase our waterproof bed end fly here.
Wind and tie-down advice
A freestanding setup reduces the need for guy ropes and pegs, but it is not a licence to leave the bed flies unsecured in strong wind.
In normal conditions the setup is typically adequate as installed. In strong winds, use additional tie-downs such as octopus / occy straps — hook them through the lower eyelets on the mesh and loop around the bed support poles. Setting up the poles so the bed fly material is taut adds structural rigidity and makes the setup far more resistant to wind failure.
Toolboxes and stone shields
In most cases a front toolbox or stone shield does not prevent the kit from working. To check before ordering:
- Set up your bed fly using the traditional upright poles
- Take one of the corner uprights
- Bring its foot back to where you plan to mount the bolts
- This shows the path the diagonal pole will take in the converted setup — you can now confirm whether it clashes with your toolbox, stone shield or other hardware
Frequently asked questions
What does the bed fly conversion kit do?
It converts your existing Jayco camper trailer bed fly into a freestanding structure, removing the need for guy ropes and pegs on most trips and reducing setup to a solo task in minutes.
Does the kit include the bed fly?
No. This is a pole conversion kit only. The bed fly itself is not included.
Which trailers does this kit fit?
The kit fits most Jayco wind-up camper trailers including the Swan, Lark, Hawk, Eagle and Flamingo. Compatibility depends on your pole arrangement and mounting points. If unsure, contact us with photos of your poles and trailer.
Which option is best if I do not want to cut my poles?
Option B is the best choice if your existing poles are compatible and you do not want to cut them. The install is reversible and takes around 30 minutes.
Which option is best if I do not have the correct poles?
Option C is the best choice if your poles are missing, non-standard, or incompatible. Everything is supplied — no existing poles required.
Which mounting kit should I choose?
For the vast majority of customers, Mounting Kit 1 is correct — it suits all Touring, Outback and Bushpack models. Kit 2 and Kit 3 are only needed for specific 2019 Outback configurations. If unsure, choose Kit 1 or send us photos of your trailer's mounting areas.
What should I do in strong wind?
Use occy straps — hook them through the lower eyelets on the mesh and loop around the bed support poles. Make sure the bed fly material is taut when set up to add structural rigidity.
Will it work if I have a front toolbox or stone shield?
In most cases yes. Set up your bed fly with the traditional poles, then bring one corner upright back to where you plan to mount the bolts — this shows the diagonal pole path and lets you confirm there's no clash with your toolbox or stone shield before ordering.
Installation manuals
Download the manual for the option you have selected. We recommend reading your manual before ordering to confirm the install process suits you.
Still not sure which kit you need?
Send us the following and we'll confirm the right combination before you buy:
- Photos of your existing poles
- Photos of the front and rear mounting areas on your trailer
- Your camper trailer model and year if known
